

I recently saw a video about creating art calendars for journaling. Not long, expressive journal entries but rather a place to capture a single moment from a day that you want to remember. That really appeals to me because it’s those small moments that are so precious. One thing I regret now that my kids are all grown up is that I didn’t take time to capture more of those moments because they’re lost from memory now. Even the ones you think you’ll never forget.
However, it’s never to late to start so I’m excited about this new project.
First, I got an 8×10 journal with paper that could handle getting wet. I debated a long time about ring-bound vs hard bound and went with the rings. My decision was based solely on the fact I had a blank one on my shelf. However, next time I’ll go for hardbound. You have to be careful about your gesso, paints and sealers with ring bound or you may find it hard to turn your pages.
After I gessoed my first page the left hand one was stuck to the rings and tore away from them at the bottom. To reinforce it so it wouldn’t fall out later, I used matte sealer and stuck it to the page underneath. With a hard bound journal this wouldn’t be a problem.
As I mentioned, I gessoed 2 pages and let them dry thoroughly. Because my journal is starting in October I chose yellow and red with a bit of blue acrylic paints to create my background. I mixed them on the page to create oranges and greens. While I really liked the colours they were too bright for me so I toned them down by adding some streaks of white and then a watery white wash over the top after the first coats had dried.

Next, I pulled out some foam stamps and added a little interest – again with my acrylics. I wanted to create a random grids of dots with shiny gold acrylic but I don’t own a stencil like that (and it was 6 a.m.) So I hunted through the house and spotted an egg carton. Cutting off the ‘points’ I put one on my finger, dipped it into the gold and Voila! A dot stamp! Even better, I could make patterns with my dots beyond a grid.

While everything dried, I cut 1.5″ squares of scrapbooking paper to use for the dates. I also cut out a banner for the top and lettered it with a touch of Halloween in mind. I did this separately so that if I fluffed it, I could remake a banner. Harder to fix the page. And I’m glad I did, because I did two banners – trying out some different ideas. This way I could choose the one I really wanted.


I placed the ‘dates’ and the banner on the page and once I was happy with the arrangement, attached them permanently with Acrylic Matte Sealer.
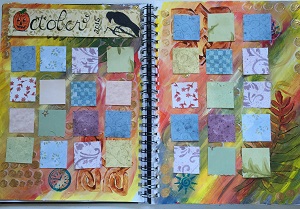
The final touches included the days across the top and dates on each square. They squares looked a little ‘floaty’ so I used my Copic markers to put borders around them. 
Now I’m all set to begin recording my October moments!